Wednesday, November 22, 2023

Kit Bash: Subtle Conversions for late war SS

Lately I've really enjoying bringing a touch of individuality to my models through subtle conversions. With a Market Garden Campaign on the horizon for next year, I felt inspired to add a personal touch to my SS troops who will play the part of the many kampfgruppen which were formed in response the allied landings.

These examples below are simple arm swaps with bits from the British Airborne plastic kit and the German Grenadiers plastic kit - both from warlord. 


This SS soldier with panzerfaust has his Kar98 slung over his shoulder. The arm and sling are from the British Airborne box with the Lee Enfield snipped off and replaced with a spare Kar98 from the German Grenadiers box. I think it really captures the feel of an exhausted soldier who's been marching for hours.


Likewise, this soldier running and swapping out his Stg44 magazine was a simple conversion made using a spare Stg44 from the SS kit and an empty arm from the British Airborne kit. I imagine him advancing under heavy fire while taking a fresh magazine from his bandolier. 


When placed together the figures look the part and capture the feeling of a small Kampfgruppen ready to push the Brits out of Arnhem!

As I continue to add to my 6th Airborne and SS armies I'm sure I will make many other conversions inspired by photos, other wargamers models and anything else I see. When complete I will be sure do post an army showcase for each army!


Signing off,

Chewie.


Tuesday, October 10, 2023

Battle Report: Armored clash

The half-track moments before its destruction
10th February 1945, The rumble of the Sherman's engine reverberated through the serene West German countryside as tank driver Greg Alexander, maneuvered down the narrow road. The rhythmic clatter of tank treads echoed the anticipation that hung in the air. As he rounded a bend, the peaceful landscape gave way to a scene of impending conflict. Before him stretched a column of German armor, ominous and unyielding. The tension inside the tank was palpable; each crew member understood the gravity of the moment. He gripped the controls with a mixture of determination and nerves, knowing that the fate of the impending clash rested on the steel shoulders of his Sherman. Little did he know, this quiet road would soon transform into the crucible of a fierce and decisive battle.

The immobilized Puma did not fire it's gun
for the whole game
The rolling fields echoed with the distant rumble of armor as the American half-track, a vital element of the Airborne's advance, moved cautiously forward. Suddenly, the tranquility shattered as a thunderous blast erupted from the treeline. A shell from a concealed German Stug III found its mark, sending the American half-track into a fiery explosion. Paratroopers inside were injured, and the shock of the blast rippled through the American ranks.

Undeterred, the German Panzer division pressed forward, but their advance was soon marred by a twist of fate. A well-aimed shot from an American Greyhound struck the German Puma, rending its wheels useless. The immobilized Puma became a focal point of the battlefield, as its crew desperately attempted repairs under the hail of bullets and shrapnel. However, the relentless pressure from the American Airborne kept the German mechanics at bay, leaving the Puma stranded throughout the entirety of the battle.

The Panzergrenadiers take cover behind the flaming
Stug III
In a strategic move, the American Sherman tank, advanced across the terrain and unleashed a devastating shell that struck the Stug III with precision. The German assault gun, once a formidable threat, now smoldered and billowed smoke. German infantry, having lost their mobile cover, sought refuge behind the burning wreckage and cried out for reinforcements.

As the battle raged on, the Luftwaffe attempted to turn the tide with a precision airstrike. However, misfortune struck when a rookie pilot mistakenly identified the German positions. In a tragic act of friendly fire, the airstrike targeted the wrong coordinates, claiming the life of the German lieutenant's attendant and further complicating the Panzer division's command structure.

Americans surge forward for the win
With the battlefield ablaze and the German forces in disarray, the American Airborne seized the initiative. Bolstered by their operational Sherman tank, the Americans surged forward, exploiting weaknesses in the fragmented German defenses. The immobilized Puma, the burning Stug, and the chaotic aftermath of the friendly fire incident left the Panzer division in disarray.

In the final moments, the American Airborne, with their Sherman leading the charge, overwhelmed the beleaguered Germans. The combination of firepower, strategic finesse, and a resolute will to win tipped the scales. The German Panzer division, now fragmented and demoralized, conceded defeat as the American forces pushed forward, securing victory in the fields of West Germany.


A convincing victory for the US forces with a final score of 10 victory points vs 4! Some unlucky rolls from my opponent sealed the deal with his Puma never passing an order after being immobilized in the first turn and his air strike rolling a 1 with me placing it onto his command unit. It was awesome to get all the vehicles out for this one and flat and open terrain of the board meant that maneuvering the tanks was important tactical factor that we both often forgot!

As usual can't wait for the next game of bolt action and perhaps time to start organising an operation Market Garden Campaign to play out in the next year!

Signing off, 

Chewie

Saturday, September 9, 2023

Kit Bash: US Airborne Forward Radio Operator


US Airborne on a SCR-300 "Walkie Talkie" radio

The SCR-300 Walkie-Talkie was a significant technological advancement in military communications during World War II. Its portability and reliability made it a valuable tool for infantry units, allowing them to communicate effectively and adapt to changing battlefield conditions. Inspired by various photos I had seen I decided to try my hand at making a dedicated forward observer model for my US airborne army with one of these radios. Previously I had just been using my Mortar team spotter (a guy holding binoculars) who definitely looked the part but was a bit awkward if I ever wanted to field my spotter + observer in the same game.


The conversion is simple enough - I used a mixture of US airborne, US army and wargames atlantic french resistance pieces to make the full plastic model.  The radio is a US ammo box with a bit of broom bristle as antenna. The earpiece is a binocular with a german grenade head and a bit of wire. Finally I like the helmet off look and the resistance fighter head was a great fit.

All in all this was a simple conversion which I feel really captures the scene of the radio operator taking a rest and relaying some co-ordinates to the battery behind the line (or pilots in the air!). I hope it inspires others to use their bits boxes creatively to make some unique models!

Signing off,

Chewie.


Monday, August 21, 2023

Battle Report: Battle for Franqueville

The morning sun rose over the French town of Franqueville on a hot summer morning. Both American and German troops entered the now abandoned town with the sole goal of driving the other force from the field. As the two sides hastily ran to get into position, German troops, strategically positioned in upper-story windows, unleashed a barrage of gunfire upon the advancing American forces. Despite their efforts, the Germans found it difficult to land effective shots as the Americans sought cover behind debris and buildings.  

Undeterred, the US soldiers pushed forward, a determined look in their eyes. With orders ringing out, they charged toward a trench that had been hastily dug by the German defenders. Enemy fire continued to rain down, forcing some Americans supporting a flamethrower team to take cover, while others made it into the trench, hoping to gain a foothold and secure a key position. However, in direct response a group of determined SS Panzer Grenadiers, driven by fanatical devotion to their cause, charged forward with reckless abandon. Their shouts of fervor echoed through the air as they stormed toward the American-held trench cutting down all the Americans within including a bazooka team.

The German machine gun team fire from
an abandoned farm house

Americans advance to the trench under heavy fire

The American Lieutenant Jack Daniels then found himself isolated from his unit, a dangerous situation in the midst of combat. As he struggled to regain his bearings, a group of determined German soldiers closed in on him and stormed the building he was taking cover in. A fierce melee ensued, and despite his best efforts, the Lieutenant was overwhelmed by the enemy's superior numbers and fell.

Lieutenant Daniels is caught by the Germans.

The loss of their leader was a devastating blow to the American morale and the German troops seized the opportunity to press their advantage. With their spirits bolstered by this turn of events, they intensified their assault, gradually pushing the American forces back. However, a well placed mortar shot from the Americans landed in the top story of the farm house and killed the machine gun crew to the man, silencing the gun once and for all.

Amidst the chaos, the French Resistance emerged from a basement of smoldering farm house, armed and ready to contribute to the battle. "Viva le Resistance!" cried one of the resistance fighters as he aimed a Panzerfaust at an approaching German motorbike, hoping to deal a decisive blow. The rocket was fired with a deafening roar, streaking across the street. However, luck was not on their side, and the warhead narrowly missed its target, erupting in an explosion that sent shrapnel flying. 


The Resistance fighters ambush the motorbike!

As the battle wore on, the German troops displayed remarkable cohesion and discipline. Their well-coordinated attacks and effective use of cover allowed them to maintain control of key positions. Despite the American soldiers' courage and resilience, they struggled to regain their momentum.

The ferocity and unwavering fanaticism of the SS soldiers charging into the trench proved decisive in this harrowing engagement. In the end, the combined efforts of the German troops and their strategic positioning proved decisive. The US forces were gradually pushed back and eventually forced to retreat from the town. The German victory was hard-fought but resounding, as they successfully defended their positions and repelled the American assault.

Another cracker of a game of bolt action! The SS charging into the trench and killing the US flamethrower team was the real turning point in the battle and the US side seemed to have the upper hand before then, in the end it was a convincing German victory. We also had some new toys to play with today - The German motorbike with sidecar and the Resistance squad. We gave the resistance squad the rule that they could come out of reserve in any terrain piece (as long as it makes sense) so they emerged from one of the empty buildings to ambush the motorbike! It was an epic moment but unfortunately my opponent did not get lucky with the dice - but that's the beauty of bolt action!

Until the next game!

Signing out,

Chewie.

Sunday, June 25, 2023

Battle Report: Capture the downed pilot.

German forces moving in on the pilot
On the cold November morning of 1944 allied planes engaged in a dog fight against a weakened Luftwaffe. A lone German ME109, already damaged from enemy fire, fought to stay airborne. However, its valiant struggle ended as it crashed into a nearby farm in Eastern France. The impact was thunderous, engulfing the area in a cloud of smoke and debris. The unexpected crash spelled it's own disaster as both allied and German intelligence were aware that the pilot of this plane had on his possession important documents crucial to the German war effort. 

Thus, a critical mission unfolded as British Commandos embarked on a daring operation to capture a downed enemy pilot carrying these crucial documents. However, their valiant efforts were soon met with unexpected challenges posed by the determined German forces. The British Commandos stealthily made their way through the treacherous terrain, moving cautiously towards the downed pilot's location. Encountering German resistance, tensions rose as both sides braced themselves for a fierce confrontation. 

SS Fanatics storm the wreckage but
there is no sign of the pilot or documents.
The wounded pilot began to stumble about the field and in his dazed state and walked straight into the hands of the British who quickly captured him, bound his arms and opened fire on the German forces arriving at the crash sight. In the midst of the chaos and uncertainty, a fierce exchange of fire erupted between the British Commandos and the German forces. 

The crack of gunfire reverberated through the air, intermingling with the deafening sounds of explosions and the screams of combatants. Both sides fought with unwavering determination, unleashing a storm of bullets upon each other, however, the German forces demonstrated their mettle.

They skillfully outmaneuvered the British Commandos, gaining the upper hand in the fierce battle. With superior tactics and unwavering resolve, the Germans pressed forward, determined to protect their position and prevent the capture of the downed pilot. A series of well placed MG42 shots coupled with the German Uberleutnant snapping his men to action at a critical time forced the British to go down lest they be cut down by the wicked fire. 
The commandos ask for appeasement from the hedge.

 A crack unit of SS veterans surged forward and assaulted the British driving them from the battlefield and securing the wounded pilot for themselves. Ordered to counter assault and drive the SS back, a British sergeant lost his mettle and instead called for a policy of appeasement attempting to let the Germans take the pilot if they would only hand over the documents. Unfortunately for the British, these calls fell onto deaf ears. The Germans forces under the intense fire from machine gun, rifle and sniper fire were able to secure the pilot and drag him to safety. In this intense encounter, the German forces showcased their exceptional combat prowess and strategic acumen.

The brave actions of the German soldiers, under heavy fire, successfully secured the downed pilot and the vital documents and won the day. The fate of the war, however, still hung in the balance.

A melee between SS and British forces.
Another excellent game of bolt action which ended in a convincing German victory. My opponent, commanding the British, made a few ill opportune moves and had his squads caught out of cover and some strong shooting from my infantry squads really turned the tide of the battle. I think he would have been better suited to use his early dice to set his squads on Ambush and wait for my men to leave cover to come capture the pilot he was escorting back to his own lines. Once again the game was so gripping I quickly forgot to take photos of some of the key turns and scenes but that's the beauty of this game, it is so immersive and leads to some real nail-biting situations! Can't wait for the next one!

Signing out,

Chewie. 

Sunday, May 28, 2023

Painting: SS Autumn Oak Leaf Camo

As an opposing side to my British Airborne I am making an SS force based around late 1944 Market Garden(ish) period. So far it has been fun doing the research and putting together the units and one thing that struck me was the interesting camouflage schemes used by the SS in the late war to blend into their surroundings. One of the most distinctive and iconic designs was the German Oakleaf Autumn Camouflage, characterised by its unique combination of dark brown and orange. This is a painting guide for my take on the iconic look.

Two German soldiers wear Autumn Leaf Camouflage smocks


Step 1: Applying the Base Coat. Start by applying a base coat to your miniature using a light, earthy tone, such as a mix of brown and green. I used Vallejo Beige Brown. This will serve as the foundation for your camouflage pattern. 


Step 2: Creating Dark Splotches. Using a small, fine-tipped brush and a darker shade of brown or green, apply irregularly shaped splotches onto the base coat. I used a 1:1 mix of Vallejo Flat Brown and Negro Black. These splotches should be random in size and placement, mimicking the patterns found in natural foliage. . Remember to keep the splotches relatively small and well-distributed to achieve a balanced and realistic effect. 


Step 3: Adding Orange Dots. To mimic the fallen autumn leaves, take an orange paint and create tiny dots on top of the dark splotches. These dots should be sporadic and irregular in shape and size. Use a small brush or even the tip of a toothpick to achieve precise and delicate dots. The orange color will provide a striking contrast against the darker background, capturing the essence of the autumn foliage. For this step I used Citadel Squig Orange.


Step 4: Applying Final Dark Splotches Now, return to the dark brown or green paint and carefully apply additional splotches over the orange dots and surrounding areas. This step helps to further blend and integrate the orange dots into the camouflage pattern, giving it a cohesive and realistic appearance. The final dark splotches should overlap slightly with the existing ones, creating a sense of depth and complexity.I then washed the model with Citadel Agrax Earthshade and filled in the other details.


I am by no means a great painter but I think it looks the part especially when the models will be viewed from arms length away on a gaming table! The process is rather time consuming and it is taking me some time to get through all the miniatures but when they are together in a squad they look quite striking (in my opinion!). Of course there were many different camouflage schemes during the war and this is serves as a guide of how I am doing mine. I will no doubt experiment with the look as this project goes on!


I hope other people find this guide helpful and use it as inspiration for their own hobby!


Signing out,

Chewie

Saturday, April 22, 2023

Battle Report: Two-Way Man hunt!

The Paratroopers advance behind the rubble
 The cold morning air hung over the small town in Eastern France, as the German scouting party made their way towards the center square. The commanding officer, Hauptmann Schmidt, ordered his men to fan out and secure the area. Unknown to him, a small American Airborne party was also on a reconnaissance mission, lurking on the outskirts of the town. As the Germans reached the square, they noticed a small group of American paratroopers approaching from the opposite end of town. Both officers simultaneously gave orders to their men to capture the enemy officers alive. A classic case of the two-way man hunt!

A fierce melee erupts in the streets!


The Americans advanced towards the center of town, using the rubble of the bombed out buildings as cover. Fire from the German machine guns proved effective and cut down a few men as they advanced forward but their resolve held and they advanced towards their enemy. Schmidt snapped his men to action and they too advanced over the hedgerow of the nearby farms and into the city streets, hell bent on capturing the US Captain.

The two sides continued to close in on each other until the German troops opened fire on the American paratroopers with a hail of bullets. The paratroopers, caught off guard, dived for cover behind nearby buildings and returned fire. The narrow streets of the town quickly become a bloodbath as the two sides engaged in a fierce melee, with bullets ricocheting off walls and grenades exploding in alleyways.

The greyhound leads the charge for the US flank.
As the melee raged on, the sound of an M8 Greyhound's engine could be heard coming up the road. The American paratroopers breathed a sigh of relief as the Greyhound's 37mm cannon quickly eliminated a few German soldiers who were hiding behind a wall. However, their moment of calm was short-lived as a Puma armored car opened fire from across the village, and a round struck a nearby building causing it to explode. The Greyhound driver frantically maneuvered to avoid further hits.The surviving German soldiers then rallied and charged into some American soldiers, who were caught off-guard and quickly overwhelmed. The Germans mercilessly stabbed the Americans with their bayonets until the last one fell, leaving the German soldiers in control of the area.

American Machine gun team fires across the field
Meanwhile on the Western flank, the German grenadiers advanced backed by their Puma Armored car. They quickly took down the US bazooka team and advanced across the field to drive the American troops out of a nearby crater. The American machine gun team, positioned in the field of a nearby farmhouse, saw the German troops attempting to flee to the cover the crater. The gunner unleashed a hail of bullets, forcing the Germans to dive for cover behind the small ridge of the crater.
The gunner adjusted his aim, and the next burst of fire found its mark, taking out two German soldiers attempting to flank the American position. The rest of the German troops were pinned down, unable to move from their position, as the American machine gun team continued to pour fire on them.

The tension in the air was palpable as the two groups closed in on each other. Suddenly, the American officer, Captain Thompson, spotted the German officer's attendant in his peripheral vision. Without hesitation, he raised his rifle and fired a shot, hitting the attendant square in the chest. The German officer was momentarily stunned, giving the American paratroopers outside his building the opportunity they needed to rush into the building and capture him.

Overpowered, Schmidt has no choice but to surrender.

Despite the Germans' efforts to resist, they were no match for the highly trained American paratroopers. The Germans were quickly subdued, and the American officer emerged from the building with his captive in tow.

It was a small victory in the grand scheme of the war, but a critical one nonetheless. The successful capture of the German officer would undoubtedly provide valuable intelligence for the Allies, and perhaps even turn the tide of the war in their favour.


This one was so close that I kept forgetting to take pictures of the action as the tide of battle swung back and forth between the two sides! The US command teams shots onto the German attendant required 6's to hit and my opponent was lucky enough to roll 2 6's to take him out and pin down my officer! The mission was a fun one with simple rules and having higher ranked officers leading our forces gave us the tough decision of leaving the officer back to avoid harm or sending them forward to support the troops and take advantage of those Snap-to's! Another gripping game of bolt action!

Signing off,

Chewie

Review: Temu Trench Terrain

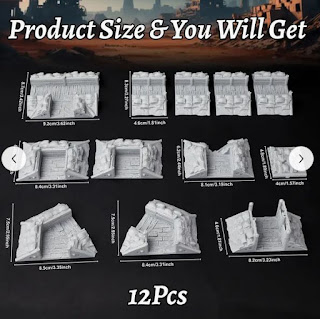
I recently saw an add for some terrain on Temu pop up while browsing the internet and had a lapse in judgement and impulse ordered it. The s...